This article was originally posted on November 9, 2022, and updated on October 28, 2026, to include the latest information available.
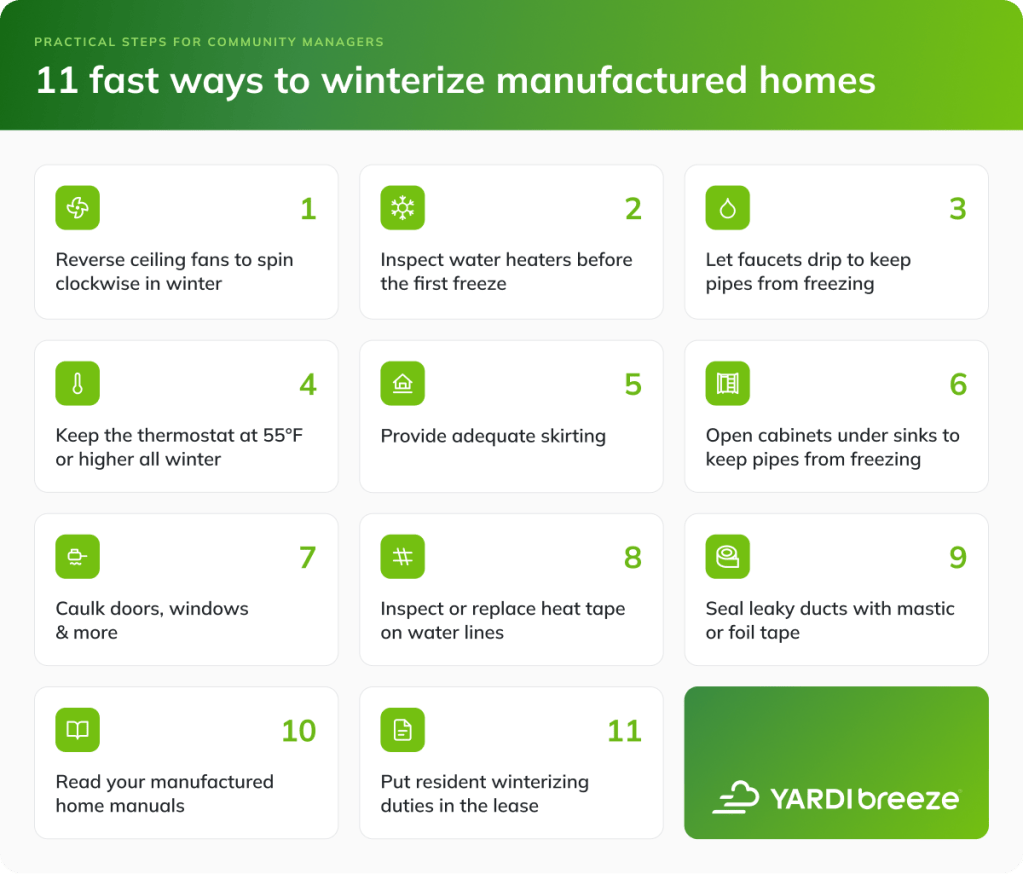
Winterizing a manufactured home means sealing out cold air, protecting the water lines and making sure residents keep the heat on. Most of it is simple work that residents can do themselves. The 11 steps below cover the whole job, from reversing ceiling fans to writing winter duties into the lease.
Manufactured homes built since 1976 follow the HUD Code, which sets federal standards for insulation, plumbing and heating. Today, energy standards for new homes are moving to HUD under the 21st Century ROAD to Housing Act. Not too much changes for community managers — yet. Once HUD adopts its standards, likely by mid-2027, new homes may arrive better insulated and sealed than the ones in your community today. That affects how much winterizing a newer home needs, not whether it needs it.
Key takeaways
- Pipes under the floor and in exterior walls freeze first, so skirting, heat tape and sealed ducts protect the home from below
- Residents handle the daily tasks: drip faucets on freezing nights, hold the thermostat at 55°F or higher and open sink cabinets
- Write those duties into the lease and send reminders before the first freeze
1. Reverse ceiling fans to spin clockwise in winter
Set ceiling fans to spin clockwise on low speed for winter. Warm air collects at the ceiling, and a clockwise fan pushes it back down along the walls without creating a draft.
Here’s how to do this. The direction switch is on the fan housing, above the blades. Stand under the fan while it runs. If you feel a breeze, it’s still on the summer setting. Flip the switch and the downward breeze should disappear.
2. Inspect water heaters before the first freeze
Check the manufacture date on the water heater’s label. Tank units last roughly 10 years. Replacing it on schedule costs less than replacing it after it floods the floor.
For any unit, look for rust or moisture at the base, corrosion around the fittings and water on the floor of the closet. A cracked tank can’t be repaired and needs replacing. Leaking valves and drain lines are a cheap fix, so swap those during the same visit.
3. Let faucets drip to keep pipes from freezing
Ask residents to let a faucet drip whenever overnight temperatures drop below freezing. Moving water freezes more slowly than standing water, and the trickle relieves pressure in the line if ice does form, which is what keeps a frozen pipe from bursting.
One faucet on each exterior wall is enough, with the cold tap open to a steady drip. The cost shows up as a few extra gallons on the water bill, far less than a burst line and the repair that follows.
4. Keep the thermostat at 55°F or higher all winter
Some residents may want to save money and/or use less energy by turning off the heat, but this can wreak havoc on the pipes when the temperature drops near or below freezing. To winterize manufactured homes properly, make sure your residents always keep their units warm.
How warm? That could depend on the building materials, how well your pipes are insulated and other factors. As a rule of thumb, the thermostat should never be set below 50-60 degrees Fahrenheit.
5. Provide adequate skirting
Skirting helps manufactured homes retain heat and prevents snow from building up under the house. It’s a lot harder to warm pipes that are sitting on a pile of snow. Any exposed areas should be skirted.
Metal, vinyl and specialty plastic skirts are common, but be sure you use a material that’s appropriate for your climate. For instance, vinyl skirting may not hold up as well in high winds and is susceptible to impact damage.
6. Open cabinets under sinks to keep pipes from freezing
Ask residents to leave the cabinet doors under kitchen and bathroom sinks open on the coldest nights. Those cabinets sit against exterior walls with no heat vent, so the pipes inside them are usually the first to freeze. An open door lets warm room air reach them.
The same goes for closets on outside walls that hide plumbing. Nobody needs to turn the home into an obstacle course all winter. A few open doors when the forecast drops below freezing is enough.
7. Caulk doors, windows & more
Caulk is inexpensive and easy to apply to gaps in windows and doors. You can’t winterize manufactured homes without making sure caulk is in place. If caulk or weatherstrip seals aren’t enough to prevent drafts, the window or door may need to be replaced.
Doors and windows are obvious candidates for caulking, but some people forget about the exhaust fans in the kitchen and bathrooms. Caulk around these built-in fans to prevent cold air from slipping through the cracks.
Last, don’t neglect the light fixtures. Manufactured homes often contain air gaps between the interior wall and the outer wall (e.g., the roof, siding). With regular maintenance, any cracks should be small and relatively easy to caulk over.
8. Inspect or replace heat tape on water lines
Heat tape is an electric cable that wraps around exposed pipes and plugs into an outlet. It keeps water lines from freezing in the crawl space under a manufactured home, which is where most freeze damage starts.
Heat tape is known to accidentally start fires when it’s old or badly installed. The Consumer Product Safety Commission singles out manufactured homes in its heat tape guidance, and its recommendations are worth building into your fall checklist:
- Replace any heat tape that’s more than three years old and not certified by UL, CSA or FM
- Unplug the tape and check its full length for cracked, charred or bare spots
- Plug three-prong cords into grounded, GFCI-protected outlets, not extension cords
- Never wrap heat tape over itself unless the manufacturer’s instructions allow it
- Don’t cover it with insulation unless the manufacturer says to, and never with foam or vinyl
If a resident installed their own heat tape, ask when and what kind. If no one knows, have a licensed electrician inspect it before the first freeze.
9. Seal leaky ducts with mastic or foil tape
Seal every accessible duct seam with duct mastic or UL 181 foil tape before winter. Ducts under a manufactured home leak at the joints, and each leak sends furnace heat into the crawl space instead of the living room.
Skip cloth duct tape. Despite the name, it dries out and peels within a season. ENERGY STAR recommends mastic or metal-backed foil tape, and both carry a UL 181 mark on the label. Foil tape is the easier option for a maintenance tech. Mastic is a paste you brush over the seam, and it lasts longer once it cures, but it’s messy and easy to apply too thin.
For a few visible seams, foil tape is a reasonable in-house job. For a full duct run or anything hard to reach, hire an HVAC contractor. Most use mastic and tape together.
10. Read your manufactured home manuals
Feeling uncertain about what you and your residents can do to winterize your manufactured homes? Read the owner’s manual that comes with every manufactured home.
You should have extra copies of the manual (the manufacturer probably has them online as well), and your residents should also have a copy for their home. Consult with them before making any major decisions regarding pipe warming, caulking, skirting, etc.
11. Put resident winterizing duties in the lease
Write residents’ winter tasks into the lease as specific actions, not a general “maintain the home” clause. Dripping faucets on freezing nights, keeping the thermostat at 55°F or higher and opening sink cabinets during cold snaps are the three that matter most, and each one is easier to enforce when it’s named.
Remind residents about their obligations before the first freeze. Send a short email or text in late fall along with the list of duties. Offer help to residents who can’t do a task themselves and ask for a quick photo if you need to confirm something was done.
Manufactured housing software can help
Winterizing manufactured homes may seem like a lot of work for your office, but there are plenty of tasks your residents can handle themselves. This is an area where manufactured housing software can help. For example, we recommend our clients to schedule a reminder on their online Breeze Premier calendar when it’s time to start winter prep. Also, email your tenants and let them know what should be done before the cold sets in.
Frequently asked questions
Who is responsible for winterizing a manufactured home, the resident or the community?
It depends on who owns the home and what the lease says. In a community-owned home, the operator usually handles skirting, heat tape and duct sealing, and the resident handles daily habits like dripping faucets. In a resident-owned home on a leased lot, the homeowner is generally responsible for the home itself, and the community for the lot and utility connections up to the home. Spell out the split in the lease or community rules, since state manufactured housing laws vary on what can be assigned to residents.
What temperature should a manufactured home be kept at in winter?
No lower than 55°F, including when the home is empty. Manufactured homes lose heat faster than site-built homes once the furnace is off, and the water lines freeze before the living space feels cold. Put the minimum in the lease so residents who travel know the expectation.
How often should heat tape be replaced?
Inspect it every fall and replace it at the first sign of cracked, charred or bare insulation. Any heat tape older than three years that isn’t certified by UL, CSA or FM should be replaced regardless of condition, according to Consumer Product Safety Commission guidance. If you don’t know when a resident installed theirs, have a licensed electrician check it.