Thanks to the Housing Act of 1980, most manufactured housing communities are modern, well-built, environmentally friendly and easy to keep climate controlled. However, a little extra effort is required to completely winterize manufactured homes. The following tips will help you prepare your properties for winter. Doing so will help lower your energy bills and possibly prevent pipes from bursting as well as other disasters.
1. Reverse the ceiling fans
Many people use their ceiling fans to cool off when it’s hot outside. This is done by spinning the fan blades counterclockwise, which pushes cool air down and pulls warm air up. (Cool air naturally wants to go down and warm air naturally wants to go up, making this an effective cooling strategy).
You can easily help winterize your manufactured homes by reversing your residents’ ceiling fans so the blades spin clockwise. This pulls up cold air, pushing all that naturally rising warm air around the room. Doing this will keep your manufactured homes warmer while using less energy.
To switch the fan blade direction, there should be a switch on the fan. If you can feel a breeze when standing directly under the fan, it’s probably spinning counterclockwise (the summer setting).
2. Inspect the water heater
Water heater tanks are generally built to last about 10-15 years. If your manufactured housing properties have aging or deteriorating water tanks, you should consider replacing them before they break, which can flood the property. You (or a professional) should inspect the tank for cracks. If there’s any cracking, the tank must be replaced.
On the other hand, damaged or cracked valves and drain lines are easy to replace, so inspect those as well.
3. Let the faucets drip
Running water is much less likely to freeze than still water. If your manufactured homes experience freezing temperatures, ask your residents to let their faucets drip around the clock. The dripping probably won’t run up the water bill, and a little water movement can prevent pipes from freezing or bursting.
4. Never turn off the heat
Some residents may want to save money and/or use less energy by turning off the heat, but this can wreak havoc on the pipes when the temperature drops near or below freezing. To winterize manufactured homes properly, make sure your residents always keep their units warm.
How warm? That could depend on the building materials, how well your pipes are insulated and other factors. As a rule of thumb, the thermostat should never be set below 50-60 degrees Fahrenheit.
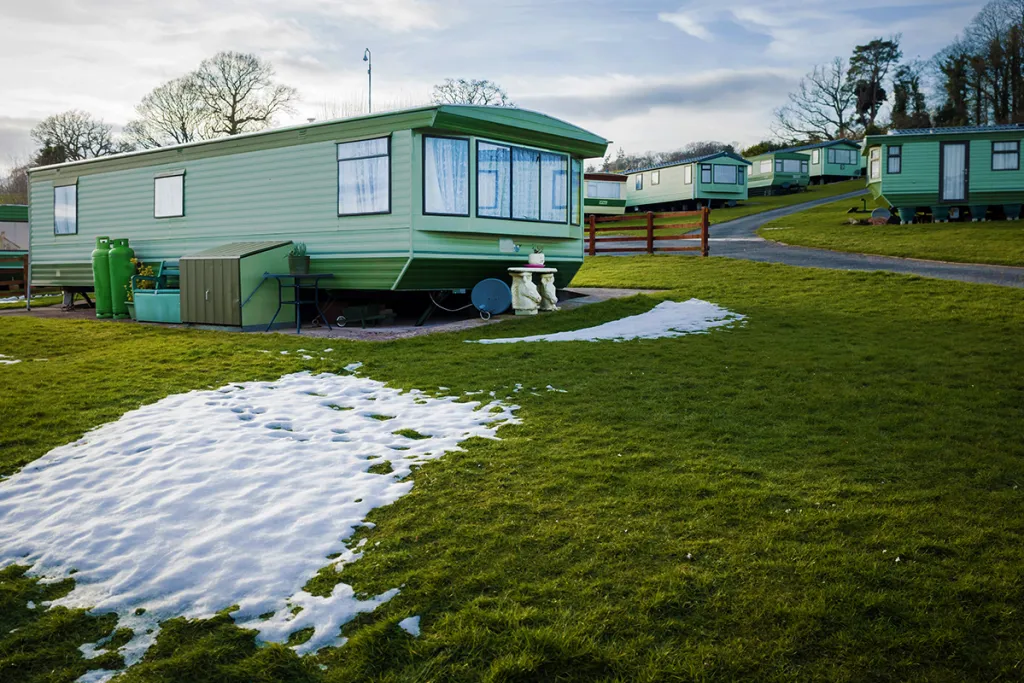
5. Provide adequate skirting
Skirting helps manufactured homes retain heat and prevents snow from building up under the house. It’s a lot harder to warm pipes that are sitting on a pile of snow. Any exposed areas should be skirted.
Metal, vinyl and specialty plastic skirts are common, but be sure you use a material that’s appropriate for your climate. For instance, vinyl skirting may not hold up as well in high winds and is susceptible to impact damage.
6. Crack open closets & cabinets
To be clear, no one is saying you need to have all your closets and cabinets open at all times, turning the home into an obstacle course. But by exposing spaces that don’t have vents to circulate heat, you keep the walls and floors heated everywhere in your apartment. This better protects pipes throughout the house.
7. Caulk doors, windows & more
Caulk is inexpensive and easy to apply to gaps in windows and doors. You can’t winterize manufactured homes without making sure caulk is in place. If caulk or weatherstrip seals aren’t enough to prevent drafts, the window or door may need to be replaced.
Doors and windows are obvious candidates for caulking, but some people forget about the exhaust fans in the kitchen and bathrooms. Caulk around these built-in fans to prevent cold air from slipping through the cracks.
Last, don’t neglect the light fixtures. Manufactured homes often contain air gaps between the interior wall and the outer wall (e.g., the roof, siding). With regular maintenance, any cracks should be small and relatively easy to caulk over.
8. Apply heat tape to water pipes
If you’re worried about frigid temperatures affecting your piping, you might want to look into heat tape. This specialized tape plugs into an outlet and works like a warming glove for your piping. Unlike other wires, heat tape (like it sounds), if installed properly, is designed to heat up without being hazardous. Heat tape can also be used to prevent ice buildup in gutters, icicle formation along roof edges or downspout clogs in drains.
Perform an annual checkup to make sure the heating element is working, or else hire a professional to inspect all your properties.
9. Seal ducts with tape, mastic or both
There are various kinds of tape to help you winterize ducts. There’s the popular cloth-backed kind you might usually think of when you hear “duct tape,” but ironically, duct tape should not actually be used on ducts.
When it comes to sealing ducts, you should consider butyl tape (also known as mastic tape). It’s thicker, more adhesive, offers better protection against moisture and is less likely to shrink or peel off. Plus, butyl tape is foil-backed. That means it does better around high heat, making it the best choice for heating ducts. There are many different kinds, so choose wisely or hire a professional.
In place of tape, mastic is often considered the best sealant. This gooey substance gets painted onto leaky areas. When it hardens and dries, it offers a permanent solution to a leaky duct. The downsides are that it can be harder to work with if you’re new to it because you might miss important leaks or apply the mastic incorrectly. Moving the duct might crack the sealant, meaning the job will have to be redone.
Mastic is also messy and unpleasant to work with, making it less than ideal for inexperienced technicians and DIY work.
It’s common for professional services to use a combination of tape and mastic, which is another reason to consider hiring someone before attempting this type of job on your own when winterizing manufactured homes.
10. Read your manufactured home manuals
Does anything from this article have you feeling uncertain about what you and your residents can do to winterize your manufactured homes?
Read the owner’s manual that comes with every manufactured home.
You should have extra copies of the manual (the manufacturer probably has them online as well), and your residents should also have a copy for their home. Consult them before making any major decisions regarding pipe warming, caulking, skirting, etc.
11. Make sure residents know their responsibilities
Include resident winterizing responsibilities in the lease. Don’t be afraid to politely send reminders, ask if they need assistance and request photo evidence if necessary. If residents need to let the faucet drip in the winter, put that specific task in the lease.
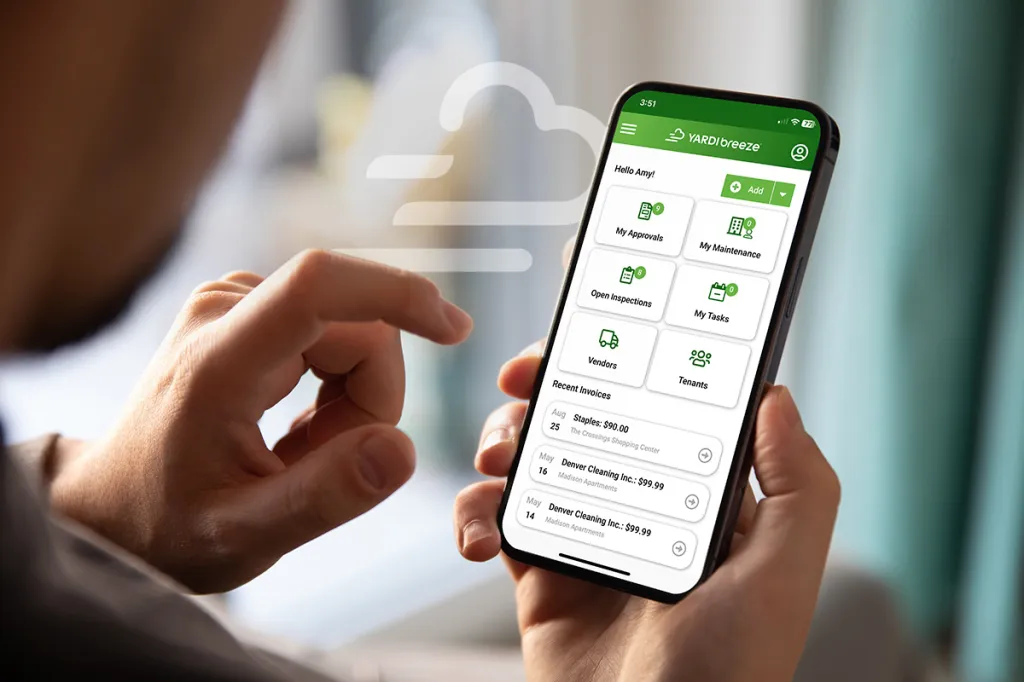
Manufactured housing software can help
Winterizing manufactured homes may seem like a lot of work for your office, but there are plenty of tasks your residents can handle themselves. This is an area where community management software can help. For example, we recommend our clients schedule a reminder on their online Breeze Premier calendar when it’s time to start winter prep. Also, email your tenants and let them know what should be done before the real cold sets in.
By having your residents do simple things, like flipping a switch to reverse ceiling fan blades or setting thermostats to hold at 60 degrees Fahrenheit, you’re freeing up your staff’s time for tasks that shouldn’t fall on residents and making life easier on any outside vendors you hire.